If you are using Filmora for Windows, please follow these steps:
Step 1: Check if Filmora's audio volume is set to 0 in the system volume mixer. If so, adjust it to a non-zero value.
Step 2: If Step 1 doesn't work, open the sound settings and click "Device properties."
Step 3: Click "Additional device properties."
Step 4: Switch to the "Advanced" tab and select "16 bit, 44100Hz (CD Quality)" as the default format, then click "Apply" and "OK."
Step 5: Restart Filmora and check if you can hear audio.
If you are using Filmora for Mac, follow these steps:
Step 1: Set the sound adapter to system default as shown in the screenshot below.
Step 2: Restart Filmora to verify normal operation.
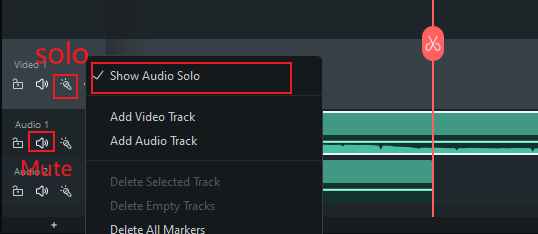
Please also check if the solo button is activated. If accidentally enabled, only audio from tracks with solo enabled will play, while other tracks will be muted. The solo button is located on the far left of the timeline and resembles a flashlight beam icon.
Critical Track-Level Checks
-
Solo Mode Verification
-
Locate the 🔦 (flashlight) icon on each track header
-
Ensure no tracks are accidentally soloed
-
Click any active solo buttons to disable them
-
-
Additional Audio Checks
-
Confirm no tracks are muted
-
Verify audio waveforms are visible in clips
-
Note: In versions above V14.11.0, if the🔦 (flashlight) icon is not displayed on the timeline, you can select it and right-click to select "Show Audio Solo"
Was This Helpful?
Thanks for your feedback.
Can you tell us what didn't work for you?
Email address is optional. Leave it blank if you do not need follow-up.
Feedback sent!